UPDATE : It is important to use the correct type of 4-pin HEI modules as there is now a new type available, which may NOT work for this project. Make sure to use the DR100 type modules, or one from the same family as described in the HEI module notes. Click on the link below for notes on the GM modules and notes on how to determine the correct type is being used.UPDATE 2019 : There is now a version using a 7-pin HEI module. The available 7-pin modules are far more consistent in their operation for a points conversion than the currently available 4-pin modules. It is recommended to use the 7-pin version if modules have not yet been purchased.
The 7-pin version is found here:
7-pin Hei Module for Points.
Introduction:
This project is to adapt a General Motors High Energy Ignition (HEI) module to provide spark for any Kawasaki KZ motorcycle originally equipped with points. It can also be used on any vehicle incorporating a 12-volt, negative-ground electrical system using a standard Kettering-style ignition system.
Purpose:
The purpose of this project is to use the HEI module in order to reduce wear on the points. It also eliminates the need for the condenser and will allow the use of lower resistance ignition coils in order to get a higher-energy spark at the plugs. It will also allow the elimination of any ballast resistor as long as the ignition coil's primary resistance is 2.4 ohms or higher.
Overview:
This project is designed to work with the stock points and the stock ignition coils. Aftermarket coils can be used, and any ballast can be eliminated, as long as the coil's primary-side resistance is not less than 2.2 ohms. The 2.2-ohm limit is imposed to prevent the HEI's internal current-limiter from becoming active. When it is active, more heat is generated inside the HEI module. In the interest of reliability, it is best to avoid unnecessary heat generation in the HEI module.One project circuit is required for every ignition coil. Therefore, a 4-cylinder KZ will require two circuits.
In order to use an HEI module with points, a small adapter circuit is required between the points and the HEI module. The adapter is basically an inverter. The points go from shorted to open in order trigger a spark. This means the voltage on the point go from 0 to some higher level (low to high) when a spark is to occur. The HEI module triggers a spark when the input voltage goes from a higher voltage to a low or negative voltage (high to low). The signal from the points must be inverted to operate the HEI correctly.
There are 4 versions of the adapter circuit described here. In the accompanying drawing, they are labeled Fig.1, Fig.2, Fig.3 and Fig.4. Please refer to them in the following descriptions.
HEI Module:
To describe this project, some background should be given about the HEI module. The module has 4 terminals plus a heat sink with mounting holes.The heat sink and mounting holes are the ground for the module.
Terminal "B" is the power connection for the module.
Terminal "C" is the output for the module. It completes the ground path for the ignition coil. Interrupting the ground path causes the coil to generate a spark.
Terminal "G" is the input to the module. When the voltage at G is higher than about 1.6 volts, the C terminal is grounded which completes the ignition coil's ground path. When the voltage at G is lower than about 1.4 volts, terminal C is open. When C first opens, the ignition coil produces a spark.
An HEI module is designed to be controlled by an inductive pickup. Terminal "W" provides a control voltage to the pickup. This control voltage extends the dwell to the ignition coil during high-rpm operation. The control voltage will not be used in this project. The dwell-control voltage is overridden by connecting W to the supply voltage.
However, the W terminal is used for another purpose in the time-out option of this project. The purpose of the "time-out" option is to prevent the ignition coil from overheating when the ignition switch is turned "on" with the points closed but with the engine not running. It works by switching off the ignition coil after 5 seconds.
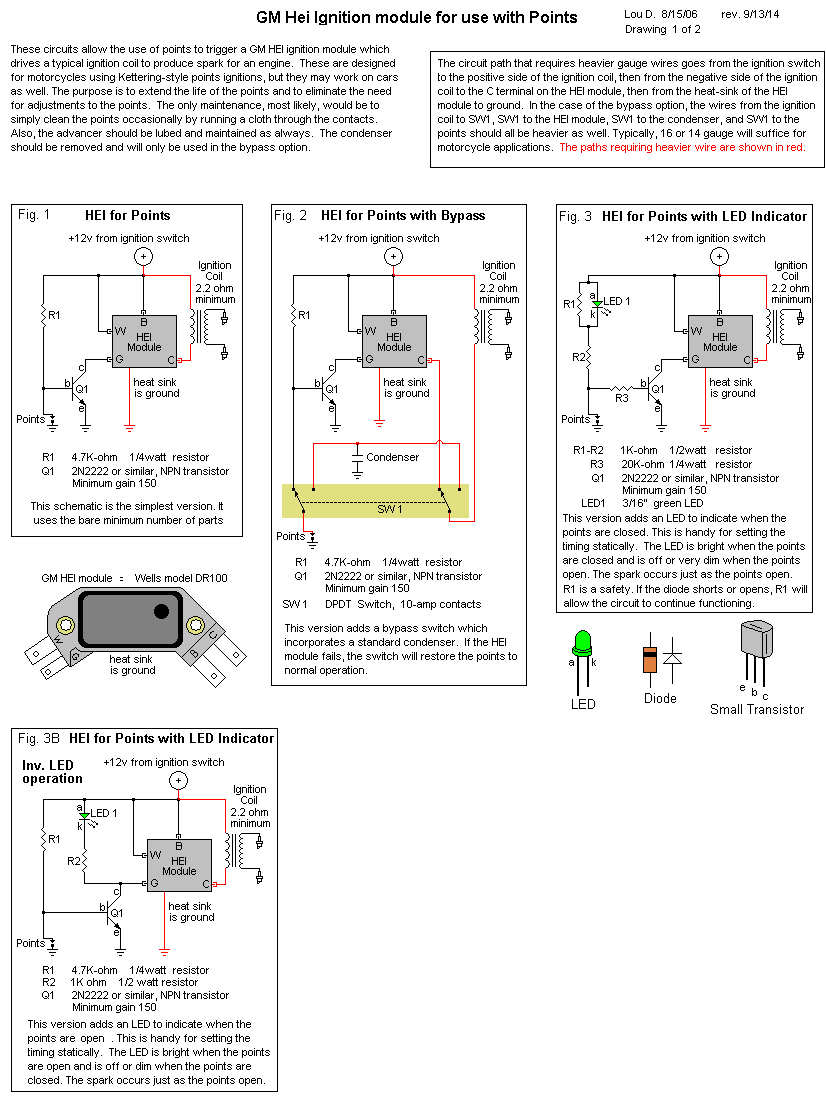
Basic Circuit (Fig. 1):
Fig. 1 is the basic inverter circuit.When the W terminal is connected to supply voltage, the G terminal has supply voltage routed to it internally. Therefore, with nothing connected to G, it defaults to "high". This means C is shorted and the ignition coil has a path to ground. In order to interrupt the coil current at C, G must be forced to go "low", by grounding it.
In order for the spark to be at the right time, G must be grounded as the points open. This requires an inverter circuit between the points and the G terminal. R1 and Q1 create an inverter circuit. The points control the inverter circuit. Q1 grounds out the G terminal when the points open.
There is very little current in the inverter/points circuit so low-power devices will suffice for Q1 and R1.
Bypass Option (Fig. 2):
Fig. 2 is the basic inverter circuit, with a bypass switch which returns the points back to their original method of operation. This is only added as a safety feature to provide a "limp-home" mode in case the HEI module or inverter-circuit fails. It requires using a standard condenser and a DPDT switch to re-route the input and output to the points and coil.In this system, it would be best to use a 3-ohm or higher coil in order to prevent excessive wear on the points during bypass operation.
Points Indicator LED Option (Fig. 3):
Fig. 3 is similar to the basic circuit, with the addition of an LED to indicate the status of the points. When the points are closed, the LED is bright. When the points are open, the LED is very dim or off. The LED is lit anytime the coil will be conducting current. This feature is very handy for setting the ignition timing using the "static" method, and will be an indicator of the coil drawing current in case the motor is stopped while the ignition is left on.
Points Indicator LED Option (Fig. 3B):
Fig. 3B is similar to the circuit in Fig. 3, with LED operating opposite of that in Fig. 3, to indicate the status of the points. When the points are open, the LED is bright. When the points are closed, the LED is very dim or off. The LED lights up just as the spark would occur. This feature is very handy for setting the ignition timing using the "static" method.
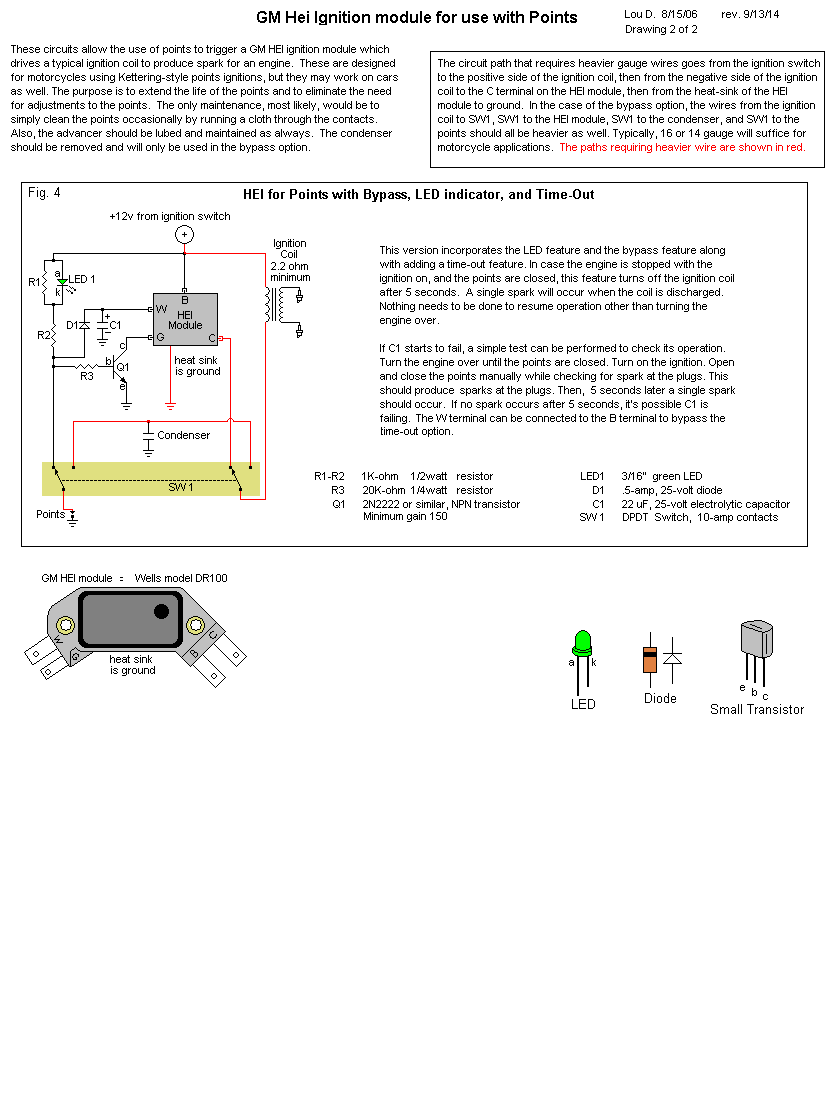
Time-Out Option (Fig. 4):
Fig. 4 combines the options of Fig. 2 and Fig. 3 with yet another option; the "time-out" option.If the points are closed while the ignition switch is on and the engine is not turning, the ignition coil has full current through it. This generates a lot of heat in the coil and some heat in the HEI module. In order to prevent damage from this condition, a "time-out" option has been devised. If the coil-current is not interrupted by cranking the engine or shutting off the ignition switch, the time-out option interrupts the coil current automatically after about 5 seconds. Normal operation will resume as soon as the engine is cranked over. This option is very important and should be included if this project is to be a permanent installation on a vehicle.
The time-out option is implemented through the use of the internal components in the W terminal, though the components were not intended for this use. The W terminal has a very high resistance in series with it. This resistance will be used during the charging of the time-out capacitor C1.
When the points are open, C1 charges quickly through R1, LED1, R2, and D1. This puts supply voltage onto C1 and thus W is also at the supply voltage level. However, the inverter Q1 is shorting out the G terminal so there is no current through the coil.
When the points close, the voltage at the R2-D1 junction is zero, but D1 prevents C1 from discharging quickly. Assuming the engine stops turning so the points stay closed, C1 slowly discharges through the W terminal's resistance. Meanwhile, G is no longer shorted and "floats" up to a voltage level equivalent to that of W. Therefore, the ignition-coil current is "on". It takes about 5 seconds for C1 to discharge to 1.4 volts. G follows W through internal circuitry, so, after 5 seconds, the voltage on G is at 1.4 volts and the coil current is interrupted. This produces a single spark.
If the points repeatedly open and close quickly, as in normal running, C1 never has time to fully discharge, but is fully charged every time the points open. In effect, C1 stays charged at supply voltage and, thus, W stays at supply voltage. This mimics the operation of the circuits in Figures 1 through 3, while the engine is running.
A few details should be mentioned about the circuit. Because of the design, the first spark occurs only after the first time the points are opened to charge C1. This means if the power is turned on while the points are closed, there will be no spark the first time the points open. Only on the second opening, and subsequent openings, will there be a spark. This behavior results from the design requirements imposed by using a capacitor discharging to produce the time delay. Other designs were tried in which the time delay was generated by the charging of a capacitor. This proved problematic, though, because it required the supply voltage to remain steady. This is not possible because when the coil turns off, the supply voltage inevitably jumps up. This causes a voltage pulse to travel through the charging capacitor, which turns the coil back on. The cycle repeats and an oscillator is formed. The result is many spark events occur after the initial time-out. The design in Fig. 4 does not have this problem since the capacitor is not affected by supply voltage as it discharges. The design in Fig. 4 also used far fewer parts than the other designs.
Construction:
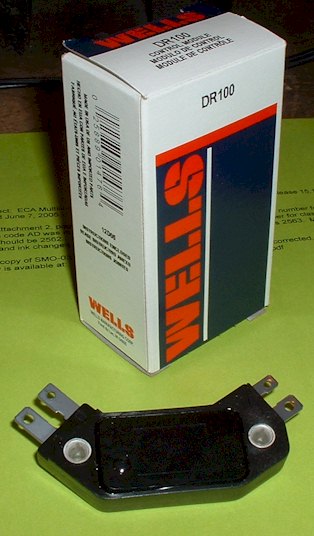
The adapter circuit takes very little power and should work fine even if sealed in silicone sealant. The HEI module will get warm to the touch and should be mounted to an aluminum heat sink. The sink should be at least 1/8 inch thick for rigidity, and should have at least 6 square inches of surface area open to air. The HEI module used for this project was a Wells model DR100. It comes with heat-sink gel included.
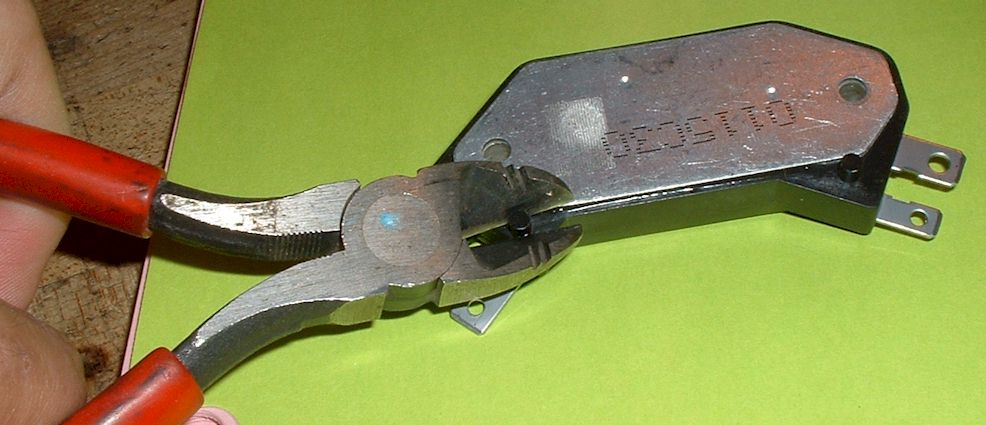
There are several different types of HEI modules. The one used here is the 4-terminal type. There are two plastic locator pins on the bottom of the module, which should be cut off in order to mount it flush to a plate. Of course, the plate could just as well be drilled to accept the pins.
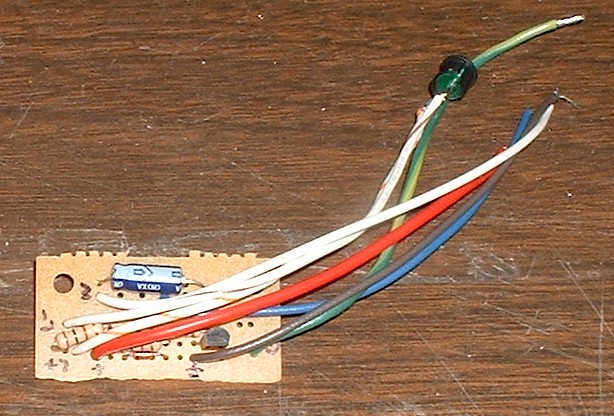
Here is the adapter board for the prototype.
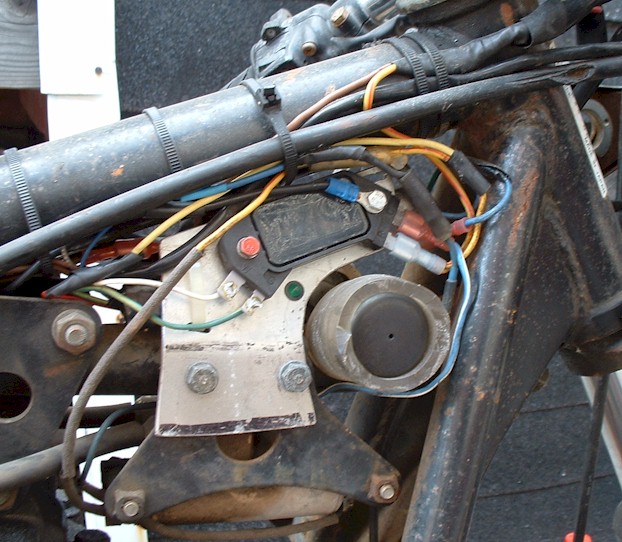
This is where we slapped the prototype onto a KZ400. It's been about 3 years and you can see the module has been getting a lot of weather, but is still working great. The LED option is visible and the circuit components are on the back side of the mounting plate.
Conclusion:
Circuits in Fig.1, Fig.2, Fig.3, and Fig.4, were assembled and hooked up to a test rig to simulate an engine. Each performed very well. The circuit in Fig. 4 was constructed and installed onto a Kawasaki KZ400 and has been in use for about 7 years as of May 2014. It's working well and this page will be updated if any reliability issues arise.