3 LED Voltage Monitor
for 12-volt automotive systems

Introduction:
This project is a voltage monitor for the charging system on typical motor vehicles employing a 12-volt electrical system. It uses three LEDs to indicate 5 different voltage levels.When the average voltage is below 12v, no LED's are on.
When the average voltage is between 12v and 13v, only the yellow LED is on.
When the average voltage is between 13v and 14v, the green LED and yellow LED are on.
When the average voltage is between 14v and 15v, only the green LED is on.
When the average voltage is above 15v, only the red LED is on.With the motor running, if the battery is below 12v average (no LED's on), the battery is drained or is being drained. It will not be long before it is dead. If the battery is between 12v and 13v average (yellow LED on), the battery is being slightly drained or is breaking even. If the battery is between 13v and 14v average (yellow and green LED's on), the battery is breaking even or is being slightly charged. If the battery is between 14v and 15v average (green LED on), the battery is being fully charged. If the battery is above 15v (red LED on), the battery is being overcharged and possibly damaged.
The voltage being detected is averaged, therefore this monitor does not detect peak-voltage. It is weighted to average the voltage for most automotive charging systems employing a single-phase or 3-phase alternator or generator. These systems must have a battery (or capacitor) in place to smooth out the pulses from the charging system in order to prevent the instantaneous voltage from going to zero. These systems also usually employ a rectifier. (A generator may produce DC by itself.) This monitor will not work accurately on systems that go to zero volts, such as in magneto-driven ignitions or AC lighting systems.
Circuit Overview:
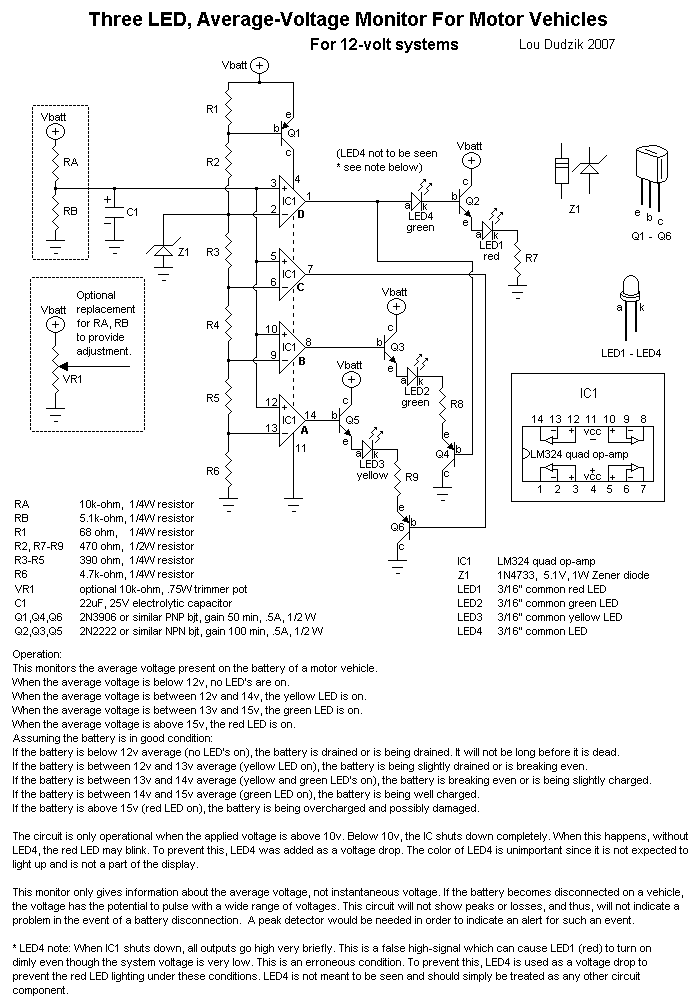
This circuit can be connected to a vehicle’s electrical system at any point that has full battery voltage present.The vehicle’s system-voltage is scaled down through a voltage divider. This voltage is then averaged by a capacitor. Next, four comparators compare the voltage against four constant reference-voltages. When the averaged voltage is higher than the relevant reference-voltage, the appropriate LED is turned on.
Circuit Notes:
Please refer to the circuit diagram.Voltage divider:
RA and RB (or optionally the VR1 trimmer pot) act as a voltage divider to reduce the system-voltage by a fixed percentage for comparison to the fixed reference voltages. They will not handle much current so power is not a concern for RA and RB or VR1.Averaging Function:
C1 averages the voltage. It is selected as a 22uF, 25V, electrolytic capacitor. Because there is very little current flowing to IC1, C1 does not have to be very large. This averaged voltage is applied to the positive input of each of the four comparators.Comparators:
The four comparators (IC1) are on an LM324 quad op-amp chip. Most similar quad op-amps will suffice as a substitute. When the voltage at the + terminal of the comparator is higher than the voltage at the – terminal, the output of the comparator is high. When the voltage at the + is lower, the output is low.Reference Voltages:
The – terminal of each comparator is connected to a constant reference-voltage. The current that supplies the reference voltages comes through R1, R2, and Q2. Z1 acts as a regulator to ensure the node connecting R2 and R3 is at 5.1 volts by shunting all extra current away from R3. This means there is a small, steady current through R3, R4, R5, and R6 (the comparators take no current into their inputs). It is simply 5.1v divided by the sum of those resistances. Since the current is constant, and the resistance is constant, the voltage drop on each resistor is constant. These voltage drops produce the 4 reference voltages. Using the current and resistance for each resistor, the reference voltages can be calculated. The reference at IC1, pin2 is 5.1v. The reference at IC1, pin6 is 4.76v. The reference at IC1, pin9 is 4.42v. The reference at IC1, pin13 is 4.08v.R2 acts as a current limiter for Z1 and is selected as a 470-ohm, 1/2W resistor.
Z1 is a 5.1V, 1W Zener diode. It requires about 10mA to produce a very steady 5.1V reference.
In order to ensure the monitor will be accurate, Q1 is used to turn on IC1 only when the reference voltages are all steady. To produce steady reference voltages, Z1 needs about 10mA before Q1 is allowed to turn on. R1 allows 10mA to the reference circuit before the base of Q1 starts to conduct. Q1 will start to conduct when the system voltage reaches about 10v. R1 determines the turn-on point for the monitor. The turn-on point is set to 10v because even though the lowest detected voltage is 12v (for the yellow LED to turn on), a lower turn-on voltage is needed because the system voltage will most likely not be steady DC. It will have a ripple of a few volts. In order for the LEDs to be seen brightly, they should be on all the time. If the turn-on voltage was 12v, the LED could possibly be off half of the time. This results in a dimmer appearance because the LED will actually be blinking on and off very rapidly instead of staying on.
Operation
When the average voltage is below 12v, all comparator outputs are low. Q5, Q3, and Q2 are all off, therefore all LED's are off.When the average voltage exceeds 12v, comparator A's output goes high. This turns on Q5, which applies voltage to the yellow LED (LED 3). Since comparator C's output is still low, Q6 is active and the yellow LED is given a path to ground so it lights up.
When the average voltage exceeds 13v, comparator B's output goes high. This turns on Q3, which applies voltage to the green LED (LED 2). Since comparator D's output is still low, Q4 is active and the green LED is given a path to ground so it lights up.
When the average voltage exceeds 14v, comparator C's output goes high. This turns off Q6, which removes the ground to the yellow LED (LED 3). The yellow LED turns off.
When the average voltage exceeds 15v, comparator D's output goes high. This turns off Q4, which removes the ground to the green LED (LED 2). The green LED turns off. Simultaneously, comparator D turns on Q2, which applies voltage to the red LED (LED1), so it lights up.
LED 4 note:
When IC1 shuts down due to the system voltage falling below 10v, all outputs go high very briefly. This is a false high signal, which can cause LED1 (red) to turn on dimly even though the system voltage is very low. This is an erroneous condition. To prevent this, LED4 is used as a voltage drop to prevent the red LED lighting under these conditions. LED4 is not meant to be seen and should simply be treated as any other circuit component.Current Limit Resistors:
R7, R8, and R9 are used to limit the current through the LEDs. They need to be 1/2-watt resistors to dissipate the heat that will be generated within them.Performance Results:
This circuit was tested using RA as 10k-ohm and RB as 5.1k-ohm. An oscilloscope was used to determine when the LEDs were starting to turn on, fully on, starting to turn off, and when fully off. This was done by observing the duty cycle on resistors R7, R8, and R9. The test voltage was a 3v P-P triangle signal with adjustable DC offset and adjustable frequency. The average voltage was measured on a Fluke 73 multi-meter.At 0Hz (pure DC):
Yellow starts to turn on at 11.86v
Yellow is fully on by 11.87v
Green starts to turn on at 12.91v
Green is fully on by 12.91v
Yellow starts to turn off at 13.95v
Yellow is fully off by 13.96v
Green starts to turn off at 15.00v
Red starts to turn on at 15.00v
Green is fully off by 15.00v
Red is fully on by 15.00vAt 20Hz:
Yellow starts to turn on at 11.75v
Yellow is fully on by 11.98v
Green starts to turn on at 12.80v
Green is fully on by 13.02v
Yellow starts to turn off at 13.84v
Yellow is fully off by 14.06v
Green starts to turn off at 14.88v
Red starts to turn on at 14.89v
Green is fully off by 15.11v
Red is fully on by 15.11vAt 50Hz:
Yellow starts to turn on at 11.78v
Yellow is fully on by 11.92v
Green starts to turn on at 12.84v
Green is fully on by 12.97v
Yellow starts to turn off at 13.89v
Yellow is fully off by 14.01v
Green starts to turn off at 14.94v
Red starts to turn on at 14.94v
Green is fully off by 15.04v
Red is fully on by 15.05vAt 500Hz:
Yellow starts to turn on at 11.81v
Yellow is fully on by 11.92v
Green starts to turn on at 12.86v
Green is fully on by 12.96v
Yellow starts to turn off at 13.91v
Yellow is fully off by 13.99v
Green starts to turn off at 14.96v
Red starts to turn on at 14.96v
Green is fully off by 15.03v
Red is fully on by 15.03v

