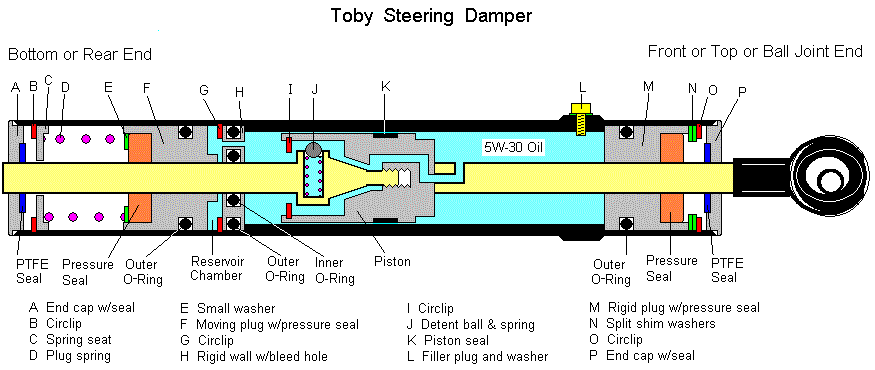
Toby Steering Damper
Disassembly / Reassembly Procedure
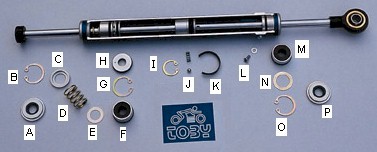
The Toby Rebuild Kit only includes the following:
Rear end cap and seal (A)
Rear moving plug, seal and O-ring (F)
Filler plug and washer (L)
Front rigid plug, seal and O-ring (M)
Front end cap and seal (P)
Disassembly
1. Remove knurled knob from shaft. Smooth out any gouges from the knob on the shaft using very fine sandpaper. It is not necessary to remove the gouges, but they should not be sharp.
2. Pull off the end caps (A & P) using vise grips or similar grabbing device. The caps are just pressed in, but can be difficult to remove without scratching the aluminum.
3. Remove the rear circlip (B). Remove spring seat (C), spring (D), and washer (E).
4. Remove the rear plug (F) as follows.
a. Pull the ball-joint end of the shaft to full extension.
b. Adjust the valve to fully tightened by holding the ball-joint and turning the rear shaft inward.
c. Remove the filler plug (L).
d. Push the ball-joint end of the shaft into the damper body as hard as possible and the rear plug (F) should come out with a large gush of oil.
e. If it does not come out on the first try, open the valve fully, then repeat steps a through d.
5. Remove front circlip (O) along with shim washers (N). If the shim washers are fully in tact, they can be cut to facilitate easy removal from the shaft. Otherwise, they must be removed by disassembling the shaft from the piston.
6. Make sure filler plug (L) is completely removed or damage to the piston will occur in this step. Pull out the ball-joint end of the shaft. This will also pull out the front rigid plug (M), piston assembly, and the rear shaft.
7. The ball-joint and shaft can be unscrewed from the piston by holding the piston with a 12mm wrench. If the rigid plug (M) must be removed, be very careful not to damage the pressure seal on the threads of the shaft. It is best to replace the plugs with new ones from the Toby rebuild kit, but old ones can be re-used successfully.
8. To disassemble the piston, remove circlip (I).
9. Unscrew the rear shaft from the piston carefully. Beware the detent ball and spring (J) can shoot out.
Note: Normally, it is not necessary to remove the rigid wall (H). Removing and replacing it without the proper tools may damage the inside of the damper body.
10. To remove rigid wall (H), remove the circlip (G) with small, long reach snap ring pliers.
11. Push the rigid wall (H) from the front end towards the rear end with an appropriate push rod. Take extreme care not to scratch the inside of the damper body.
Assembly
1. If the rigid wall (H) was removed, install it from the rear end with an appropriate push rod. Orient the bleed hole so that it is pointing toward the filler hole on the damper body. This makes it easier to know which way to hold the damper when bleeding out the air.
2. Install the circlip (G) with appropriate snap ring pliers. Make sure the clip is seated all the way around.
Note: The movable plug (F) can be identified by a small lip around the shaft opening. The rigid plug (M) does not have the lip.
3. Pre-assemble the piston and shafts. Make sure the rigid plug (M), shim washers (N), circlip (O), and end cap (P) are on the ball-joint shaft and in the right order and orientation. When installing the detent ball and spring (J), pre-fill the spring's hole with oil. This will keep air out of the system.
4. The next step is to install the piston/shaft assembly into the body. Before attempting this, however, the piston must be prepared. Normally, the piston seal (K) will prevent the installation of the piston into the body. A makeshift ring compressor can be made from electrical tape. Cut a piece of electrical tape approximately 2 inches (5 cm) long. Make sure there is absolutely no oil on the piston, the tape, or on your fingers. Wrap the tape very tightly around the piston such that the edge of the tape is centered on the piston seal (K). The rest of the tape should wrap toward the ball-joint side of the piston.
5. To prevent damage to the piston, make sure the filler plug (L) is not installed. Apply a small amount of oil to the piston and seal (K). Install the piston/shaft assembly into the front of the damper body. The blank shaft goes in first. As the piston presses in, the tape should slide off the piston. The tape can be removed as the piston enters the tube.
6. The rigid plug (M), shim washers (N), circlip (O), and end cap (P) can now be pressed in. The shim washers are to make sure there is no movement in the rigid plug. Install shims as necessary. Typically there are one or two. Make sure the shim washers are not in the circlip's groove. Also make sure the shim washers are flat against each other without the cut ends doubling up on each other. Make sure the circlip is seated all the way around.
7. Note where the bleed hole is located in rigid wall (H) in relation to the filler hole in the damper body by looking into the bottom of the damper. Then turn the damper upside down and pour oil into the open bottom until there is about a 1/2 inch of oil (1.5 cm) pooled in the damper.
8. Press in the movable plunger (F) only until its O-ring is just inside the damper body.
9. In order to bleed the air out of the over flow chamber, turn the damper upright (ball-joint up) and tilt it slightly so the bleed hole will be near the highest point. Push the movable plunger (F) all the way in using an appropriate push rod.
10. Install small washer (E), spring (D), spring seat (C), and circlip (B). Press in end cap (A).
11. Install the knurled knob on the end of the shaft.
12. Open the piston valve up all the way (hold ball joint and unscrew rear shaft until the stop is felt). Fill the damper with oil while keeping the filler hole upward. A syringe makes this much easier. Move the shaft in and out slowly to work the air through the piston. A gurgling noise while moving the shaft indicates air in the piston. Keep adding oil and cycling the shaft to expell all of the air. It takes a while for all of the tiny bubbles to work their way up to the filler hole.
13. When all of the air is out and the damper is full, make sure the piston valve is all the way open. Then install the filler plug and washer (L). The piston valve must be open to allow for maximum amount of oil in the sytem. Once the filler plug is installed, closing the piston valve causes a slight excess of oil to flow into the reservoir chamber. This puts a slight positive pressure inside the damper (via spring (D) ) to prevent air from entering the damper.
Oil change only
If no disassembly is required and only an oil change is to be done, do the following.
1. Drain the oil by removing the filler plug (L) and cycling the shaft repeatedly with the piston valve all the way open.
The next two steps are to bleed the air out of the reservoir chamber.
2. Fill the damper with oil and leave the filler plug (L) out (this will be messy). A syringe makes this easier. Open the piston valve all the way. While holding the damper upright (ball-joint upward), cycle the shaft a few times.
3. Pull the ball-joint end of the shaft all the way out to full extension. Close the piston valve all the way. While holding the damper upright (ball-joint upward), push the ball-joint end of the shaft in (downward) all the way (this takes a while). This forces oil into the reservoir chamber. While maintaining the upright position, open the piston valve all the way. Hold the damper upright for a minute.
Repeat steps 2 and 3 at least once.
4. Fill the damper with oil again while keeping the filler hole upward. Move the shaft in and out slowly to work the air through the piston. A gurgling noise while moving the shaft indicates air in the piston. Keep adding oil and cycling the shaft to expell all of the air. It takes a while for all of the tiny bubbles to work their way up to the filler hole.
5. When all of the air is out and the damper is full, make sure the piston valve is all the way open. Then install the filler plug and washer (L). The piston valve must be open to allow for maximum amount of oil in the sytem. Once the filler plug is installed, closing the piston valve causes a slight excess of oil to flow into the reservoir chamber. This puts a slight positive pressure inside the damper (via spring (D) ) to prevent air from entering the damper.